
Combining Namecheap email with Gmail offers a simple way to manage your communications. This integration helps you keep everything in one place, making your life easier.
Namecheap provides affordable and reliable email services, while Gmail is popular for its user-friendly interface and powerful features. When you blend these two, you get the best of both worlds. Setting up Namecheap email with Gmail might seem complex, but it’s actually straightforward.
This guide will walk you through the process step-by-step. You’ll soon see how easy it is to manage your Namecheap email from your Gmail account, allowing you to streamline your email tasks and stay organized. Let’s get started on making your email life more efficient.

Credit: www.youtube.com
Introduction To Namecheap Email
Many businesses and individuals prefer Namecheap Email for its affordability and reliability. It offers a range of features that make managing email easy and efficient. Setting up your Namecheap Email is simple, and it helps you keep your professional communication streamlined.
Benefits Of Namecheap Email
- Cost-Effective: Namecheap offers affordable email hosting plans.
- Reliable Service: Enjoy consistent uptime and secure email delivery.
- Easy Management: The user-friendly interface makes email management simple.
- 24/7 Support: Access customer support any time you need it.
Why Integrate With Gmail
Integrating Namecheap Email with Gmail provides several advantages. You can manage all your emails from one interface. This means you do not need to switch between multiple accounts.
Another benefit is Gmail’s advanced filtering and security features. By combining both, you can enjoy a powerful email management system. This integration is especially useful for users who are already familiar with Gmail’s interface.
Setting Up Namecheap Email
Setting up your Namecheap email with Gmail can enhance your communication. It allows you to manage all your emails from one platform. This guide will help you set up your Namecheap email with ease.
Account Creation
First, create your Namecheap email account. Log in to your Namecheap account. Go to the “Email” section. Click “Add Email Account.” Fill out the form with your name, email address, and password. Click “Create Account.” Your Namecheap email account is now ready.
Configuring Dns Settings
Next, configure your DNS settings. Go to the “Domain List” in your Namecheap account. Click “Manage” next to your domain. Select the “Advanced DNS” tab. Scroll down to “Mail Settings.” Choose “Custom MX” from the dropdown menu. Enter the following MX records:
- Priority: 10, Mail Server: mx1.privateemail.com
- Priority: 20, Mail Server: mx2.privateemail.com
Click “Save Changes.” Your DNS settings are now configured.
Configuring Gmail To Use Namecheap Email
Configuring Gmail to use your Namecheap email can streamline your communications. By combining these two services, you can manage your email more efficiently. This guide will walk you through the steps to set up Gmail with your Namecheap email.
Accessing Gmail Settings
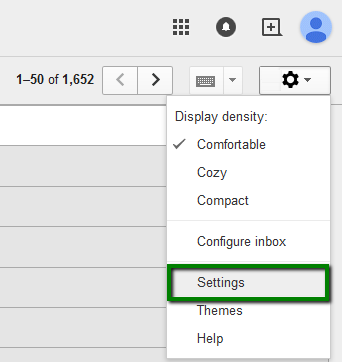
First, log in to your Gmail account. In the top right corner, click the gear icon. Select “See all settings” from the drop-down menu. This will open the Settings page.
Next, navigate to the “Accounts and Import” tab. This tab contains all the options you need to add and manage email accounts.
Adding Namecheap Email Account
Under the “Accounts and Import” tab, find the “Check mail from other accounts” section. Click on “Add a mail account.” A new window will pop up.
Enter your Namecheap email address in the provided field. Click “Next.” Select “Import emails from my other account (POP3)” and click “Next” again.
Now, you need to fill in your Namecheap email settings. Enter your full email address as the username. Type in your email password. For the POP server, use “mail.yourdomain.com” and set the port to 995. Check the box for “Always use a secure connection (SSL) when retrieving mail.”
Click “Add Account.” Gmail will verify the settings. If everything is correct, your Namecheap email will be added to Gmail. You can now send and receive emails from your Namecheap account using Gmail.
Smtp And Pop/imap Settings
Understanding how to use SMTP and POP/IMAP settings is vital for integrating Namecheap email with Gmail. These settings ensure smooth email delivery and retrieval. SMTP handles outgoing mail while POP/IMAP manages incoming mail. Let’s dive into each aspect for a seamless setup.
Understanding Smtp
SMTP stands for Simple Mail Transfer Protocol. It’s the system responsible for sending emails. SMTP servers ensure your email reaches its destination. Namecheap provides specific SMTP settings. Use these settings to configure your Gmail account. This allows you to send emails through your Namecheap email address via Gmail.
Configuring Pop/imap In Gmail
POP (Post Office Protocol) and IMAP (Internet Message Access Protocol) handle incoming emails. POP downloads emails from the server to your device. IMAP, on the other hand, keeps your emails on the server. Choose IMAP if you want to access your email from multiple devices. Gmail supports both protocols. To configure, enter the settings provided by Namecheap into Gmail. This enables Gmail to fetch emails from your Namecheap account.
Follow these steps to configure:
- Open Gmail and go to Settings.
- Click on the “Accounts and Import” tab.
- Select “Add a mail account.”
- Enter your Namecheap email address and click “Next.”
- Choose “Import emails from my other account (POP3)” or “Import emails using IMAP.”
- Enter the required server settings provided by Namecheap.
- Click “Add Account” to complete the setup.
These steps ensure that your Namecheap email works seamlessly with Gmail. Now you can send and receive emails without hassle.
Verifying Your Email Configuration
After setting up your Namecheap email with Gmail, it’s vital to verify the configuration. This ensures emails are sent and received without any issues. Below, we will guide you through sending a test email and troubleshooting common problems.
Sending A Test Email
To confirm your setup, send a test email. Follow these steps:
- Open Gmail.
- Click on “Compose” to start a new email.
- In the “To” field, type your Namecheap email address.
- Enter a subject like “Test Email”.
- Write a short message in the body.
- Click “Send”.
Check your Namecheap email for the test message. This confirms everything is working properly.
Troubleshooting Common Issues
If you don’t receive the test email, check the following:
- Spam Folder: The email might have gone to spam.
- SMTP Settings: Ensure your SMTP settings are correct.
- Server Connection: Make sure you’re connected to the internet.
Here are some common SMTP settings for Namecheap:
| Setting | Value |
|---|---|
| SMTP Server | mail.yourdomain.com |
| Port | 587 |
| Encryption | STARTTLS |
If issues persist, double-check your login credentials. Incorrect usernames or passwords can cause problems. Make sure to use the full email address as the username.
By following these steps, you can ensure your Namecheap email works smoothly with Gmail.
Managing Your Integrated Email
Managing your integrated email can save time and keep you organized. By integrating Namecheap Email with Gmail, you can handle all your messages in one place. This section will guide you on organizing emails and setting up filters and labels.
Organizing Emails
Keeping your inbox clutter-free is essential. Use the Archive feature to remove emails from your inbox without deleting them. Archived emails stay in your account and are searchable. Another way to organize is by using the Star feature. Star important emails to find them quickly later. You can also use the Move to option to relocate emails to different folders.
Consider creating folders for different types of emails. For instance, make folders for work, personal, and promotional emails. This will make it easier to locate specific messages. Gmail also offers a tab system to sort emails into categories like Primary, Social, and Promotions. This automatic sorting helps keep your inbox tidy.
Setting Up Filters And Labels
Filters and labels are powerful tools in Gmail. Filters can automatically sort incoming emails based on specific criteria. For instance, you can set a filter to send all emails from a particular sender to a designated folder.
To create a filter:
- Click on the gear icon in Gmail and select See all settings.
- Navigate to the Filters and Blocked Addresses tab.
- Click on Create a new filter.
- Enter the criteria for your filter and click Create filter.
Labels work like tags that you can apply to emails. They help identify and group related messages. You can create labels for different projects, clients, or types of communication.
To create a label:
- Go to the left sidebar in Gmail and scroll down to More.
- Click on Create new label.
- Enter the name of your label and click Create.
Using filters and labels together can streamline your email management. For example, you can set a filter to automatically apply a label to certain emails. This makes your inbox less overwhelming and helps you stay on top of important messages.
Advanced Tips For Seamless Integration
Integrating Namecheap Email with Gmail can be a straightforward process. But knowing some advanced tips makes it more efficient. This section will cover advanced tips for a seamless integration. Let’s dive deeper into using aliases and syncing contacts and calendars.
Using Aliases
Aliases can help you manage multiple email addresses from one inbox. To set this up, go to your Gmail settings. Click on ‘Accounts and Import’ and then ‘Add another email address.’ Enter your Namecheap email address. Follow the prompts to verify it. Now, you can send emails from your Namecheap address using Gmail. This keeps your inbox organized and efficient.
Syncing Contacts And Calendars
Syncing contacts and calendars ensures you never miss important information. Use the Google Contacts app to sync your contacts. Export your Namecheap contacts as a CSV file. Import this file into Google Contacts. This keeps all your contacts in one place.
For calendars, use Google Calendar. Export your Namecheap calendar as an ICS file. Import it into Google Calendar. This way, all your events and reminders are synced. You can manage your schedule more efficiently.

Credit: www.youtube.com
Security Best Practices
Using Namecheap Email with Gmail offers convenience and efficiency. Yet, keeping your email secure is crucial. Implementing security best practices ensures your information remains safe. Below are key strategies you should follow.
Two-factor Authentication
Two-Factor Authentication (2FA) adds an extra layer of security. It requires you to verify your identity in two ways. First, you enter your password. Then, you confirm your identity through a code sent to your phone. This makes it harder for others to access your account.
To enable 2FA on Gmail:
- Open your Gmail account settings.
- Navigate to the “Security” tab.
- Select “2-Step Verification” and follow the prompts.
Using 2FA protects your email from unauthorized access. Always keep your phone secure and avoid sharing the verification code.
Regular Password Updates
Updating your password regularly is a simple way to enhance security. Choose a strong password that includes:
- At least 12 characters
- A mix of letters, numbers, and symbols
- Both uppercase and lowercase letters
Avoid using easily guessable passwords such as “password123” or “qwerty”. Instead, create a passphrase or use a password manager to generate a strong password.
To update your Gmail password:
- Go to your Gmail account settings.
- Click on “Security”.
- Select “Password” and enter your new password.
Updating your password every three to six months is ideal. This practice helps keep your account secure.
Credit: www.namecheap.com
Frequently Asked Questions
How Do I Link Namecheap Email To Gmail?
To link Namecheap email to Gmail, first log into your Gmail account. Then, go to Settings, select Accounts and Import, and add your Namecheap email account under “Check mail from other accounts. “
Can I Use Namecheap Email With Gmail?
Yes, you can use Namecheap email with Gmail. You need to configure your Namecheap email settings in Gmail. This allows you to send and receive emails from your Namecheap account through Gmail.
What Are The Namecheap Email Settings For Gmail?
The Namecheap email settings for Gmail include the IMAP or POP3 server addresses. You will also need your Namecheap email username and password to configure these settings.
Does Namecheap Email Work With Gmail Filters?
Yes, Namecheap email works with Gmail filters. You can set up filters in Gmail to automatically organize and manage emails received from your Namecheap account.
Conclusion
Setting up Namecheap email with Gmail enhances your communication. It’s simple and effective. Follow the steps to link your accounts. Enjoy the convenience of managing emails in one place. Save time and stay organized. With this setup, your productivity increases.
Now, you can focus on what matters. Try it today and see the difference. It’s a smart choice for better email management.