
You can use Namecheap email with Gmail by linking the two accounts. This allows you to manage all your emails in one place, making it easier and more convenient.
Managing multiple email accounts can be a hassle. If you have a Namecheap email and a Gmail account, integrating them can simplify your life. By connecting Namecheap email with Gmail, you can send and receive all your emails from one inbox.
This setup not only saves time but also ensures that you never miss an important message. In this guide, we will show you step-by-step how to link your Namecheap email with your Gmail account. This way, you can enjoy the seamless experience of handling your emails from a single platform. Ready to streamline your email management? Let’s dive in!
Introduction To Namecheap Email
Managing your email can be a hassle, especially if you run a business. With many services available, you need one that’s reliable and easy to use. Enter Namecheap Email. This service offers a seamless way to manage your emails. Plus, it integrates well with other platforms like Gmail.
What Is Namecheap Email?
Namecheap Email is a service provided by Namecheap. It allows you to manage your email with a custom domain. This means you can have professional email addresses like you@yourdomain.com. It is designed to be user-friendly and reliable.
Benefits Of Namecheap Email
First, Namecheap Email offers excellent uptime. Your emails will always be available. This is crucial for staying connected with clients and customers.
Second, it provides strong security features. Your emails are protected from spam and phishing attacks. This keeps your information safe.
Third, the service is affordable. You get great features without breaking the bank. This makes it a good choice for small businesses and startups.
Fourth, it integrates well with other email services. For example, you can use Namecheap Email with Gmail. This allows you to manage all your emails from one place. It simplifies your workflow.
Finally, Namecheap offers excellent customer support. If you face any issues, help is just a click away. Their support team is known for being responsive and helpful.

Credit: www.youtube.com
Setting Up Namecheap Email
Setting up your Namecheap email account can be easy. This guide will help you get it done quickly. Follow the steps below to connect your Namecheap email with Gmail.
Creating A Namecheap Email Account
First, log in to your Namecheap account. Navigate to the “Email” section. Click on “Add New Email Account.” Enter the desired email address and password. Confirm the details and click “Create Account.” Your Namecheap email account is now ready.
Configuring Dns Settings
Next, configure your DNS settings. Go to your Namecheap dashboard. Click on the “Domain List” tab. Find your domain and click “Manage.” Navigate to the “Advanced DNS” tab. Add the required MX records for your email service. This ensures your emails are routed correctly.
After adding the MX records, save the changes. Allow some time for the DNS settings to propagate. This process can take up to 48 hours. Once completed, your email will be ready to use with Gmail.
Integrating Namecheap Email With Gmail
Integrating Namecheap Email with Gmail helps streamline your email management. This integration allows you to handle both Namecheap and Gmail emails in one place. It improves your productivity and ensures you never miss an important email. Follow these steps to integrate Namecheap Email with Gmail easily.
Gmail Account Preparation
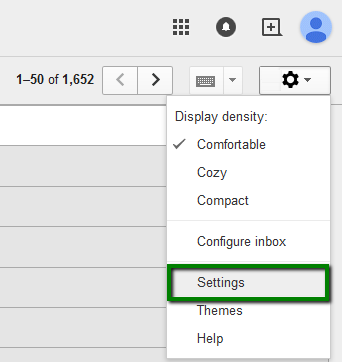
First, ensure your Gmail account is ready for integration. Open your Gmail account on your computer. Click on the gear icon in the top right corner. Select ‘See all settings’ from the dropdown menu. Navigate to the ‘Accounts and Import’ tab. Here, you will find options to add another email account.
Connecting Namecheap Email To Gmail
Now, connect your Namecheap Email to Gmail. In the ‘Accounts and Import’ tab, click on ‘Add a mail account’. A new window will pop up. Enter your Namecheap email address and click ‘Next’. Select ‘Import emails from my other account (POP3)’ and click ‘Next’.
Enter your Namecheap email settings. Fill in the username and password fields. For ‘POP Server’, enter ‘mail.yourdomain.com’. Use port 995. Check the box next to ‘Always use a secure connection (SSL)’. Click ‘Add Account’.
Next, you will be asked if you want to send emails as your Namecheap email. Select ‘Yes’ and click ‘Next’. Enter your Namecheap email details again. Use ‘mail.yourdomain.com’ as the SMTP server. Use port 465. Check ‘Secured connection using SSL’. Click ‘Add Account’.
Gmail will send a verification code to your Namecheap email. Check your Namecheap email for the code. Enter the code in Gmail and click ‘Verify’. Your Namecheap email is now integrated with Gmail.
Configuring Gmail Settings
Using Namecheap Email with Gmail is very convenient. It allows you to manage all your emails in one place. Setting up Gmail to work with Namecheap Email involves configuring a few settings. Follow these steps to ensure everything works smoothly.
Setting Up Gmail Pop3
To retrieve your Namecheap emails in Gmail, you need to set up POP3.
- Open your Gmail account and go to Settings.
- Click on the Accounts and Import tab.
- Under the Check mail from other accounts section, click Add a mail account.
- Enter your Namecheap email address and click Next.
- Select Import emails from my other account (POP3) and click Next.
- Enter your full email address as the username.
- Enter your Namecheap email password.
- In the POP Server field, enter mail.yourdomain.com.
- Set the port to 995.
- Check the box for Always use a secure connection (SSL) when retrieving mail.
- Click Add Account.
Configuring Smtp Settings
To send emails from your Namecheap account through Gmail, configure the SMTP settings.
- Go to the Accounts and Import tab in Gmail settings.
- Under the Send mail as section, click Add another email address.
- Enter your Namecheap email address and click Next Step.
- Enter smtp.yourdomain.com in the SMTP Server field.
- Set the port to 587 or 465.
- Choose Secured connection using TLS or SSL.
- Enter your full email address as the username.
- Enter your Namecheap email password.
- Click Add Account.
Now you can send and receive emails using your Namecheap email through Gmail. This method helps you manage your email communications effectively.
Managing Emails
Managing emails effectively is crucial. Using Namecheap Email with Gmail helps streamline email management. You can import emails, organize folders, and create labels. This guide will show you how to manage your emails easily.
Importing Emails
First, you need to import your emails from Namecheap to Gmail. Open Gmail, and click on the gear icon. Select “See all settings.” Go to the “Accounts and Import” tab. Click “Import mail and contacts.” Follow the instructions to import your emails. This process will bring your Namecheap emails into your Gmail account.
Organizing Folders And Labels
Gmail uses labels instead of folders to organize emails. Labels help you categorize your emails. Click on the “Create new label” option in the left sidebar. Name your label and click “Create.” You can now apply this label to any email.
To move emails into a label, select the email. Click on the label icon at the top. Choose the label you created. The email will now be organized under that label.
For better organization, use multiple labels for different categories. You can also nest labels under other labels. This keeps your inbox tidy and easy to navigate.
Troubleshooting Common Issues
Experiencing issues while using Namecheap Email with Gmail? You’re not alone. Many users face common problems. Let’s tackle these issues and make your email experience smooth.
Authentication Errors
Authentication errors can be frustrating. Follow these steps to resolve them:
- Double-check your login credentials: Ensure your username and password are correct. A small typo can cause issues.
- Enable Less Secure Apps: Gmail sometimes blocks apps it considers less secure. Enable this option in your Gmail settings.
- Two-Factor Authentication (2FA): If you use 2FA, generate an app-specific password. Use this instead of your regular password.
If these steps don’t work, contact Namecheap support for further assistance.
Email Sync Problems
Email sync problems can disrupt your communication. Here’s how to fix them:
- Check IMAP/POP settings: Ensure IMAP/POP is enabled in your Gmail account. Go to Settings > Forwarding and POP/IMAP.
- Update server settings: Use the correct server settings provided by Namecheap. Double-check for any errors.
- Clear cache and cookies: Sometimes, cached data can cause issues. Clear your browser’s cache and cookies.
If the problem persists, check your internet connection. A stable connection is key to smooth email syncing.
| Issue | Solution |
|---|---|
| Incorrect Password | Ensure the password is correct and case-sensitive. |
| IMAP Not Enabled | Enable IMAP in Gmail settings under Forwarding and POP/IMAP. |
| Server Settings | Verify server settings with Namecheap documentation. |
Following these steps should resolve most issues. Happy emailing!
Advanced Configuration
Once you’ve set up your Namecheap email with Gmail, you might want to explore advanced settings. These settings can help you organize and manage your emails better. Below, we will cover using filters and rules, and setting up forwarding.
Using Filters And Rules
Filters and rules help sort emails automatically. This keeps your inbox clean and organized. Here’s how you can set them up:
- Open Gmail and click on the settings gear icon.
- Select See all settings.
- Navigate to the Filters and Blocked Addresses tab.
- Click on Create a new filter.
- Enter the criteria for the filter (e.g., from a specific email address).
- Click on Create filter.
- Choose what you want Gmail to do with the emails that match the criteria.
- Click Create filter to finalize.
Using filters can help you automatically label, archive, or delete emails. This can save you a lot of time and keep your inbox clutter-free.
Setting Up Forwarding
Forwarding lets you send a copy of incoming emails to another email address. This is useful if you use multiple email accounts. Here’s how to set it up:
- Open Gmail and click on the settings gear icon.
- Select See all settings.
- Navigate to the Forwarding and POP/IMAP tab.
- Click on Add a forwarding address.
- Enter the email address you want to forward emails to.
- Click Next and then Proceed.
- Check your forwarding email for a verification message from Gmail.
- Click the verification link in the email.
- Go back to Gmail settings and confirm the forwarding address.
Setting up forwarding ensures you don’t miss important emails. It also allows you to manage emails from one place.

Credit: www.youtube.com
Maintaining Security
Maintaining security is crucial when using Namecheap Email with Gmail. Ensuring your email remains secure protects your personal information and communication. Focus on these key areas to enhance your email security.
Enabling Two-factor Authentication
Two-factor authentication (2FA) adds an extra layer of security. This method requires two verification steps to access your account. First, log in with your password. Then, enter a code sent to your mobile device. This method reduces the risk of unauthorized access.
Setting up 2FA on Gmail is simple. Go to your Google Account settings. Find the Security section. Click on 2-Step Verification. Follow the instructions to complete the setup. Always keep your mobile device secure. It plays a vital role in 2FA.
Regularly Updating Passwords
Regularly updating passwords helps keep your account secure. Change your passwords every few months. Use strong passwords with a mix of letters, numbers, and symbols. Avoid using easily guessed words or phrases.
To update your Namecheap Email password, log in to your Namecheap account. Go to the Security settings. Choose the option to change your password. Follow the instructions to complete the update. Do the same for your Gmail account. This habit ensures your email stays protected.
Credit: www.namecheap.com
Frequently Asked Questions
How To Link Namecheap Email With Gmail?
To link Namecheap email with Gmail, go to Gmail settings. Add your Namecheap email as a new account under “Accounts and Import”.
Can I Use Gmail With Namecheap Email?
Yes, you can use Gmail with Namecheap email. Simply configure your Namecheap email in Gmail’s settings under “Accounts and Import”.
What Are The Benefits Of Using Namecheap Email With Gmail?
Using Namecheap email with Gmail offers convenience, better email management, and access to Gmail’s powerful features like spam filtering and search.
Is It Easy To Integrate Namecheap Email With Gmail?
Yes, integrating Namecheap email with Gmail is easy. Follow Gmail’s setup wizard to add your Namecheap email account.
Conclusion
Connecting Namecheap email with Gmail enhances email management. It’s simple and efficient. Follow the outlined steps carefully. This setup keeps your emails organized. You can access everything in one place. It saves time and effort. Now, handling emails becomes a breeze.
Enjoy the benefits of seamless integration. Your email experience just got better. Thank you for reading. Happy emailing!