
Connecting your Namecheap domain to Shopify is easy. Start selling online in no time.
Using a custom domain name boosts your brand’s credibility. It makes your online store look professional. Namecheap is a popular choice for buying domains because it’s affordable and user-friendly. Shopify, on the other hand, is a leading e-commerce platform. It helps you create and manage your online store effortlessly.
Combining Namecheap and Shopify gives you the best of both worlds. This guide will walk you through the steps. You’ll learn how to link your Namecheap domain to Shopify. Follow these simple instructions, and your store will be up and running soon. Ready to make your online business shine? Let’s get started!
Credit: www.namecheap.com
Introduction To Namecheap And Shopify
Starting an online store can be exciting. Choosing the right tools is key. Namecheap and Shopify are two popular options. Namecheap provides domain names. Shopify is a platform for e-commerce. Together, they help you build a strong online presence.
Why Choose Namecheap
Namecheap is a trusted domain name provider. It is known for affordable prices and excellent customer service. Here are some reasons to choose Namecheap:
- Cost-effective: Namecheap offers competitive prices on domain names.
- Ease of Use: The interface is simple and user-friendly.
- Security: Free WhoisGuard to protect your personal information.
- Customer Support: 24/7 support via chat or email.
Benefits Of Using Shopify
Shopify is a powerful e-commerce platform. It helps you create and manage an online store. Here are some benefits of using Shopify:
- Ease of Setup: Set up your store quickly with no coding.
- Customizable Themes: Many templates to choose from.
- Payment Integration: Accept various payment methods.
- SEO Tools: Built-in tools to improve your store’s visibility.
- App Store: Add extra features with apps.
Combining Namecheap and Shopify can set you up for online success. Choose your domain with Namecheap. Build your store with Shopify. It’s that simple.
Purchasing A Domain On Namecheap
Purchasing a domain on Namecheap is an easy and affordable way to start your online store on Shopify. Namecheap offers a variety of domain options, making it simple for you to find the perfect domain for your brand. This guide will walk you through the steps of selecting and purchasing your domain on Namecheap.
Selecting The Right Domain
Choosing the right domain is crucial for your online presence. A good domain is memorable and reflects your brand. Here are some tips to help you select the best domain:
- Keep it short and simple. Avoid long and complex names.
- Choose a domain that is easy to spell and pronounce.
- Incorporate keywords that are relevant to your business.
- Avoid using numbers and hyphens, which can confuse customers.
- Check for domain availability using Namecheap’s search tool.
Once you have a list of potential domains, use the search tool on Namecheap to see if they are available. This tool provides alternative suggestions if your preferred domain is taken.
Completing The Purchase
After selecting your domain, the next step is to complete the purchase. Follow these steps:
- Add the domain to your cart by clicking the “Add to Cart” button.
- Review your cart and select the registration period. Namecheap offers options from one year to ten years.
- Enable WHOIS Guard for privacy protection. This service keeps your personal information private.
- Click “Confirm Order” to proceed to checkout.
- Fill in your billing information and select a payment method. Namecheap accepts credit cards, PayPal, and Bitcoin.
- Review your order and click “Pay Now” to finalize the purchase.
After completing these steps, Namecheap will send a confirmation email with your domain details. You can now proceed to connect your new domain to Shopify.
Accessing Your Domain Settings
Accessing your domain settings on Namecheap is crucial for connecting your domain to Shopify. This process allows you to manage and configure your domain settings effectively. Let’s break it down into simple steps, starting with navigating the Namecheap dashboard and finding your domain.
Navigating The Namecheap Dashboard
First, log in to your Namecheap account. You’ll land on the dashboard. Here, you can see all your services. Look for the “Domain List” on the left-hand side. Click on it to proceed.
The Domain List section displays all your domains. Locate the domain you want to use with Shopify. This step is straightforward and easy to follow.
Finding Your Domain
Once you’re in the Domain List, find the specific domain. You can use the search bar if you have many domains. Type your domain name in the search bar to find it quickly.
After locating your domain, you’ll see a “Manage” button next to it. Click on this button to access your domain settings. This will take you to the domain management page.
Changing Dns Settings
Changing DNS settings is essential for connecting your Namecheap domain to Shopify. This process ensures your domain points to your Shopify store, making it accessible to your customers.
Understanding Dns Basics
DNS stands for Domain Name System. It translates domain names into IP addresses. This translation allows browsers to load websites. When you update DNS settings, you change how your domain directs traffic. Understanding this concept is crucial before making changes.
| Term | Explanation |
|---|---|
| DNS | Domain Name System |
| IP Address | Internet Protocol Address, a unique number for a device |
| A Record | Maps a domain to an IP address |
| CNAME | Maps a domain to another domain |
Updating Dns Records
To update your DNS records, follow these steps:
- Log in to your Namecheap account.
- Go to the Dashboard and select Domain List.
- Click the Manage button next to your domain.
- Navigate to the Advanced DNS tab.
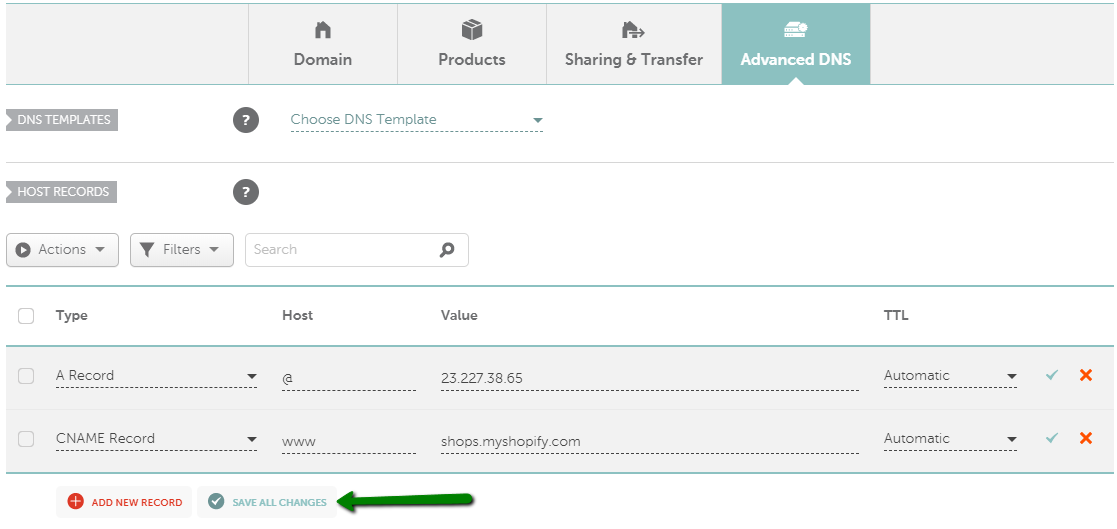
Here, you will see different types of DNS records. To connect your domain to Shopify, you need to update the A Record and CNAME Record.
Update the A Record:
- Find the A Record section.
- Edit the record to point to Shopify’s IP address: 23.227.38.65.
- Save your changes.
Update the CNAME Record:
- Find the CNAME Record section.
- Change the www value to shops.myshopify.com.
- Save your changes.
After updating these records, it may take a few hours for the changes to propagate. Once complete, your Namecheap domain will point to your Shopify store.
Connecting Your Domain To Shopify
Connecting your Namecheap domain to Shopify is a key step in building your online store. This process ensures your customers can easily find your website. Follow these simple steps to link your domain and start selling online with Shopify.
Accessing Shopify Admin
First, log in to your Shopify account. You will land on your Shopify admin dashboard. This dashboard allows you to manage all aspects of your store.
In the left-hand menu, find and click on “Settings.” Next, click on “Domains.” You will see options for managing your store’s domain.
Adding A Custom Domain
In the “Domains” section, click on “Connect existing domain.” A new page will appear. Enter your Namecheap domain name in the provided field.
Click “Next.” Shopify will show instructions for updating your DNS settings in Namecheap. Follow these steps carefully. Log in to your Namecheap account in another tab.
In Namecheap, go to the “Domain List” tab. Find your domain and click “Manage.” Under the “Advanced DNS” tab, add the provided Shopify records. Save the changes.
Return to Shopify and click “Verify connection.” Shopify may take a few minutes to verify. Once verified, your domain will be connected to your Shopify store. Now, your customers can visit your store using your custom domain.
Verifying Domain Connection
Verifying that your Namecheap domain is correctly connected to your Shopify store is essential. This ensures that your customers can access your site without any issues. Follow these steps to confirm the connection is successful.
Checking Dns Propagation
After updating your DNS settings, it might take some time for changes to propagate. DNS propagation can take up to 48 hours. To check the status:
- Go to a DNS propagation checker tool online.
- Enter your domain name.
- Check if the DNS records are updated worldwide.
If the DNS records show the correct IP address, the changes are successful.
Confirming Domain Setup
Once DNS propagation is complete, confirm the domain setup in Shopify. Follow these steps:
- Log in to your Shopify admin panel.
- Go to Online Store and then Domains.
- Check if your domain is listed as connected.
If your domain shows as connected, it is correctly set up.
Ensure to refresh your browser or clear the cache if you face any issues.
Troubleshooting Common Issues
Setting up a Namecheap domain on Shopify can be tricky. Problems can arise, causing frustration. This guide will help you troubleshoot common issues.
Dns Errors
DNS errors are common when configuring a domain. Ensure your DNS settings are correct.
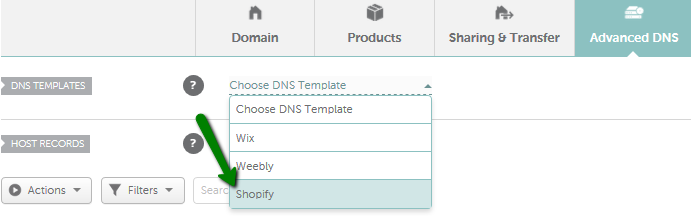
- Log in to your Namecheap account.
- Go to the Domain List tab.
- Click Manage next to your domain.
- Set the DNS to Namecheap BasicDNS.
Next, update the DNS records:
| Type | Host | Value | TTL |
|---|---|---|---|
| A Record | @ | 23.227.38.65 | Automatic |
| CNAME Record | www | shops.myshopify.com | Automatic |
Incorrect DNS settings cause most errors. Double-check these values.
Domain Not Connecting
Sometimes, your domain won’t connect to Shopify. Follow these steps to fix it.
- Log in to your Shopify admin.
- Go to Online Store > Domains.
- Click Connect existing domain.
- Enter your domain and click Next.
- Follow the instructions to verify the connection.
If the domain still doesn’t connect, check the following:
- Ensure your A Record points to Shopify’s IP address: 23.227.38.65.
- Verify your CNAME Record points to: shops.myshopify.com.
- Wait for DNS propagation. It can take up to 48 hours.
Persistent issues? Contact Namecheap support for help.
Maintaining Your Domain
Maintaining your Namecheap domain on Shopify ensures your online store runs smoothly. This involves regular updates and renewals. Let’s explore these critical steps.
Renewing Your Domain
To keep your domain active, you need to renew it before it expires. Here’s how:
- Log in to your Namecheap account.
- Navigate to the Dashboard.
- Select the domain you want to renew.
- Click on Renew.
- Choose your renewal period and confirm payment details.
Set up auto-renewal to avoid missing renewal dates. Auto-renewal ensures your domain stays active without manual intervention.
Updating Contact Information
Keep your contact information up to date. This is vital for domain management and security.
Follow these steps to update your contact details:
- Log in to your Namecheap account.
- Go to Account Settings.
- Click on Profile.
- Update your email, phone number, and address.
- Save the changes.
Ensure your email is correct. Important notifications about your domain will be sent here.
Additional Tips And Resources
Setting up your Namecheap domain on Shopify can be straightforward. But, having extra tips and resources can make the process smoother. Here are some additional pointers to help you.
Using Namecheap Support
Namecheap offers excellent support services. Their team can help you with any domain-related issues.
- Visit the Namecheap Support Center for guides and FAQs.
- Use the live chat feature for quick assistance.
- Check out their video tutorials for step-by-step instructions.
Don’t hesitate to reach out. Their support team is friendly and knowledgeable.
Exploring Shopify Guides
Shopify provides a wealth of resources to help you. Explore their guides to make the most of your online store.
| Resource | Description |
|---|---|
| Shopify Help Center | Detailed articles on every aspect of your store. |
| Shopify Academy | Free courses on various e-commerce topics. |
| Shopify Community | Forums where you can ask questions and share tips. |
These resources can be invaluable. They help you understand how to use your Namecheap domain on Shopify effectively.

Credit: help.shopify.com
Credit: www.namecheap.com
Frequently Asked Questions
How Do I Connect Namecheap Domain To Shopify?
To connect your Namecheap domain to Shopify, log in to your Namecheap account. Update the DNS settings to point to Shopify’s IP addresses. Verify the domain connection in your Shopify admin panel.
Can I Use A Namecheap Domain On Shopify?
Yes, you can use a Namecheap domain on Shopify. You need to update the DNS settings in your Namecheap account to point to Shopify.
What Are The Dns Settings For Shopify?
The DNS settings for Shopify include an A record pointing to Shopify’s IP address and a CNAME record pointing to shops. myshopify. com.
How Long Does Domain Setup Take?
The domain setup process can take up to 48 hours to fully propagate. However, it usually takes less time.
Conclusion
Connecting your Namecheap domain to Shopify is straightforward. Follow the steps provided. Enjoy the benefits of a branded domain. Your online store will appear more professional. Customers will trust you more. It’s a simple way to boost credibility. With these tips, you can easily manage your domain.
Now, your Shopify store is ready to shine. Happy selling!